
Introduction
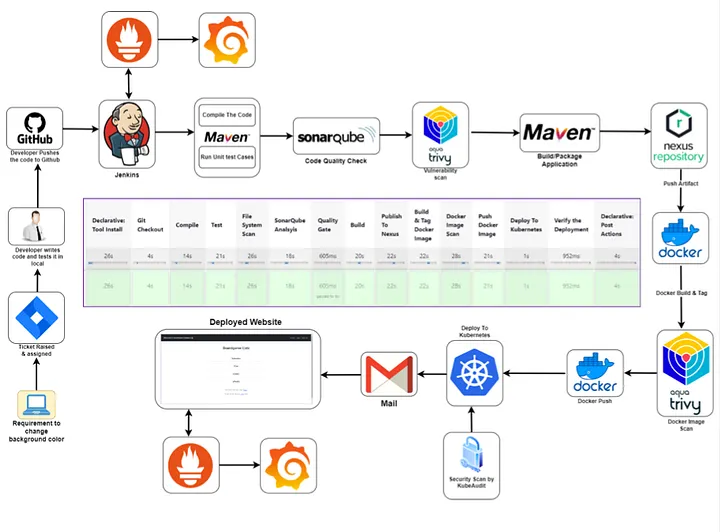
This article provides a comprehensive guide on setting up a Continuous Integration/Continuous Deployment (CI/CD) pipeline using various DevOps tools. The project involves deploying a board game application on a Kubernetes cluster, with the pipeline set up in Jenkins.
Phase 1: Infrastructure Setup
Setting Up the Environment
The environment setup involves creating an Ubuntu EC2 instance in AWS. Here are the steps to create an Ubuntu EC2 instance:
- Sign in to the AWS Management Console.
- Navigate to the EC2 dashboard.
- Click on the “Instances” link in the EC2 dashboard sidebar.
- Click the “Launch Instance” button.
- In the “Step 1: Choose an Amazon Machine Image (AMI)” section, select “Ubuntu” from the list of available AMIs.
- Choose the Ubuntu version you want to use. For example, “Ubuntu Server 20.04 LTS”.
- In the “Step 2: Choose an Instance Type” section, select the instance type that fits your requirements. The default option (usually a t2.micro instance) is suitable for testing and small workloads.
- Configure instance details such as network settings, subnets, IAM role, etc. You can leave these settings as default for now.
- Specify the size of the root volume (default is usually fine for testing purposes).
- Optionally, add tags to your instance for better organization and management.
- In the “Step 6: Configure Security Group” section, configure the security group to allow SSH access (port 22) from your IP address. You may also want to allow other ports based on your requirements (e.g., HTTP, HTTPS).
- Review the configuration of your instance.
- Select an existing key pair or create a new one.
- Check the acknowledgment box.
- Click “Launch Instances”.
- Access Your Instance: Use Mobaxterm
Setting Up Kubernetes
A Kubernetes cluster is set up using kubeadm. The cluster is configured to use Calico for networking and NGINX for ingress control. Here are the steps to set up Kubernetes:
- Update System Packages [On Master & Worker Node]
sudo apt-get update
- Install Docker[On Master & Worker Node]
sudo apt install docker.io -y
sudo chmod 666 /var/run/docker.sock
- Install Required Dependencies for Kubernetes[On Master & Worker Node]
sudo apt-get install -y apt-transport-https ca-certificates curl gnupg
sudo mkdir -p -m 755 /etc/apt/keyrings
- Add Kubernetes Repository and GPG Key[On Master & Worker Node]
curl -fsSL [2](https://pkgs.k8s.io/core:/stable:/v1.28/deb/Release.key) | sudo gpg -- dearmor -o /etc/apt/keyrings/kubernetes-apt-keyring. gpg
echo 'deb [signed-by=/etc/apt/keyrings/kubernetes-apt-keyring. gpg] [3](https://pkgs.k8s). io/core: /stable : /v1. 28/deb/ /' | sudo tee /etc/apt/sources. list.d/kubernetes. list
- Update Package List[On Master & Worker Node]
sudo apt update
- Install Kubernetes Components[On Master & Worker Node]
sudo apt install -y kubeadm=1.28.1-1.1 kubelet=1.28.1-1.1 kubectl=1.28.1-1.1
- Initialize Kubernetes Master Node [On MasterNode]
sudo kubeadm init -- pod-network-cidr=10.244.0.0/16
- Configure Kubernetes Cluster [On MasterNode]
mkdir -p $HOME/ .kube
sudo cp -i /etc/kubernetes/admin.conf $HOME/.kube/config
sudo chown $(id -u):$(id -g) $HOME/.kube/config
- Deploy Networking Solution (Calico) [On MasterNode]
kubectl apply -f https: //docs. projectcalico.org/v3.20/manifests/calico. yaml
- Deploy Ingress Controller (NGINX) [On MasterNode]
kubectl apply -f [4](https://raw.githubusercontent). com/kubernetes/ingress - nginx/controller-v0.49.0/deploy/static/provider/baremetal/deploy. yaml
Setting Up Jenkins
Jenkins is installed on the Ubuntu instance. Various plugins like Eclipse Temurin Installer, Pipeline Maven Integration, Config File Provider, SonarQube Scanner, Kubernetes CLI, Kubernetes, Docker, and Docker Pipeline Step are installed in Jenkins to support the pipeline. Here are the steps to install Jenkins on Ubuntu:
- Install OpenJDK 17 JRE Headless
sudo apt install openjdk-17-jre-headless -y
- Download Jenkins GPG key
sudo wget -O /usr/share/keyrings/jenkins-keyring.asc \\ [5](https://pkg). jenkins. io/debian-stable/jenkins. io-2023. key
- Add Jenkins repository to package manager sources
/dev/null “>
echo deb [signed-by=/usr/share/keyrings/jenkins-keyring. asc] \\ [6](https://pkg.jenkins.io/debian-stable) binary/ | sudo tee | /etc/apt/sources. list.d/jenkins. list > /dev/null
- Update package manager repositories
sudo apt-get update
- Install Jenkins
sudo apt-get install jenkins -y
Setting Up Nexus
Nexus is set up using a Docker container. It is used as a repository to store build artifacts. Here are the steps to set up Nexus:
- Update package manager repositories
sudo apt-get update
- Install necessary dependencies
sudo apt-get install -y ca-certificates curl
- Create directory for Docker GPG key
sudo install -m 0755 -d /etc/apt/keyrings
- Download Docker’s GPG key
sudo curl -fsSL [7](https://download.docker.com/linux/ubuntu/gpg) -o /etc/apt/keyrings/docker.asc
- Ensure proper permissions for the key
sudo chmod a+r /etc/apt/keyrings/docker.asc
- Add Docker repository to Apt sources
/dev/null “>
echo "deb [arch=$(dpkg -- print-architecture) signed- by=/etc/apt/keyrings/docker. asc] https: //download. docker. com/linux/ubuntu \\ $(. /etc/os-release && echo \"$VERSION_CODENAME\") stable\" | | sudo tee /etc/apt/sources. list.d/docker. list > /dev/null
- Update package manager repositories
sudo apt-get update
- Install Docker
sudo apt-get install -y docker-ce docker-ce-cli containerd.io docker-buildx-plugin docker-compose-plugi
- Create Nexus using docker container
docker run -d -- name nexus -p 8081: 8081 sonatype/nexus3: latest
Setting Up SonarQube
SonarQube is also set up using a Docker container. It is used for code quality and security analysis. Here are the steps to set up SonarQube:
- Update package manager repositories
sudo apt-get update
- Install necessary dependencies
sudo apt-get install -y ca-certificates curl
- Create directory for Docker GPG key
sudo install -m 0755 -d /etc/apt/keyrings
- Download Docker’s GPG key
sudo curl -fsSL [7](https://download.docker.com/linux/ubuntu/gpg) -o /etc/apt/keyrings/docker.asc
- Ensure proper permissions for the key
sudo chmod a+r /etc/apt/keyrings/docker.asc
- Add Docker repository to Apt sources
/dev/null “>
echo "deb [arch=$(dpkg -- print-architecture) signed- by=/etc/apt/keyrings/docker. asc] https: //download. docker. com/linux/ubuntu \\ $(. /etc/os-release && echo \"$VERSION_CODENAME\") stable\" | | sudo tee /etc/apt/sources. list.d/docker. list > /dev/null
- Update package manager repositories
sudo apt-get update
- Install Docker
sudo apt-get install -y docker-ce docker-ce-cli containerd.io docker-buildx-plugin docker-compose-plugin
- Create Sonarqube Docker container
docker run -d --name sonar -p 9000:9000 sonarqube:lts-community
Phase 2: Private Git Setup
Steps to create a private Git repository, generate a personal access token, connect to the repository, and push code to it:
Create a Private Git Repository:
Go to your preferred Git hosting platform (e.g., GitHub, GitLab, Bitbucket).
Log in to your account or sign up if you don’t have one.
Create a new repository and set it as private.
Generate a Personal Access Token:
Navigate to your account settings or profile settings.
Look for the “Developer settings” or “Personal access tokens” section.
Generate a new token, providing it with the necessary permissions (e.g., repo access).
Clone the Repository Locally:
Open Git Bash or your terminal.
Navigate to the directory where you want to clone the repository.
Use the git clone command followed by the repository’s URL. For example:
git clone <repository_URL>
Replace <repository_URL> with the URL of your private repository.
Add Your Source Code Files:
Navigate into the cloned repository directory.
Paste your source code files or create new ones inside this directory.
Stage and Commit Changes:
Use the git add command to stage the changes:
git add .
Use the git commit command to commit the staged changes along with a meaningful message:
git commit -m "Your commit message here"
Push Changes to the Repository:
Use the git push command to push your committed changes to the remote repository:
git push
If it’s your first time pushing to this repository, you might need to specify the remote and branch:
git push -u origin master
Replace master with the branch name if you’re pushing to a different branch.
Enter Personal Access Token as Authentication:
When prompted for credentials during the push, enter your username (usually your email) and use your personal access token as the password.
By following these steps, you’ll be able to create a private Git repository, connect to it using Git Bash, and push your code changes securely using a personal access token for authentication.
Phase 3: CI/CD Pipeline
Pipeline Configuration
The pipeline is configured in Jenkins using a declarative pipeline script. The pipeline stages include Git checkout, code compilation, unit testing, file system scan, SonarQube analysis, quality gate check, build packaging, artifact publishing to Nexus, Docker image build and push, deployment to Kubernetes, and deployment verification.
Here is an example of a Jenkins pipeline configuration:
pipeline {
    agent any
    tools {
        jdk 'jdk17'
        maven 'maven3'
    }
    environment {
        SCANNER_HOME = tool 'sonar-scanner'
    }
    stages {
        stage('Git Checkout') {
            steps {
                git branch: 'main', credentialsId: 'git-cred', url: 'YOUR_GIT_REPO_URL'
            }
        }
        stage('Compile') {
            steps {
                sh "mvn compile"
            }
        }
        stage('Test') {
            steps {
                sh "mvn test"
            }
        }
        stage('File System Scan') {
            steps {
                sh "trivy fs --format table -o trivy-fs-report.html ."
            }
        }
        stage('SonarQube Analysis') {
            steps {
                withSonarQubeEnv('sonar') {
                    sh '''$SCANNER_HOME/bin/sonar-scanner -Dsonar.projectName=BoardGame -Dsonar.projectKey=BoardGame -Dsonar.java.binaries=.'''
                }
            }
        }
        stage('Quality Gate') {
            steps {
                script {
                    waitForQualityGate abortPipeline: false, credentialsId: 'sonar-token'
                }
            }
        }
        stage('Build') {
            steps {
                sh "mvn package"
            }
        }
        stage('Publish To Nexus') {
            steps {
                withMaven(globalMavenSettingsConfig: 'global-settings', jdk: 'jdk17', maven: 'maven3', mavenSettingsConfig: '', traceability: true) {
                    sh "mvn deploy"
                }
            }
        }
        stage('Build & Tag Docker Image') {
            steps {
                script {
                    withDockerRegistry(credentialsId: 'docker-cred', toolName: 'docker') {
                        sh "docker build -t adijaiswal/boardshack:latest ."
                    }
                }
            }
        }
        stage('Docker Image Scan') {
            steps {
                sh "trivy image --format table -o trivy-image-report.html adijaiswal/boardshack:latest"
            }
        }
        stage('Push Docker Image') {
            steps {
                script {
                    withDockerRegistry(credentialsId: 'docker-cred', toolName: 'docker') {
                        sh "docker push adijaiswal/boardshack:latest"
                    }
                }
            }
        }
        stage('Deploy To Kubernetes') {
            steps {
                withKubeConfig(caCertificate: '', clusterName: 'kubernetes', contextName: '', credentialsId: 'k8-cred', namespace: 'webapps', restrictKubeConfigAccess: false, serverUrl: 'https://YOUR_K8S_CLUSTER_IP:6443') {
                    sh "kubectl apply -f deployment-service.yaml"
                }
            }
        }
        stage('Verify the Deployment') {
            steps {
                withKubeConfig(caCertificate: '', clusterName: 'kubernetes', contextName: '', credentialsId: 'k8-cred', namespace: 'webapps', restrictKubeConfigAccess: false, serverUrl: 'https://YOUR_K8S_CLUSTER_IP:6443') {
                    sh "kubectl get pods -n webapps"
                    sh "kubectl get svc -n webapps"
                }
            }
        }
    }
    post {
        always {
            script {
                def jobName = env.JOB_NAME
                def buildNumber = env.BUILD_NUMBER
                def pipelineStatus = currentBuild.result ?: 'UNKNOWN'
                def bannerColor = pipelineStatus.toUpperCase() == 'SUCCESS' ? 'green' : 'red'
                def body = <html> <body> <div style="border: 4px solid ${bannerColor}; padding: 10px; "> <h2>${jobName} - Build ${buildNumber}</h2> <div style="background-color: ${bannerColor}; padding: 10px; "> <h3 style="color: white; ">Pipeline Status: ${pipelineStatus.toUpperCase()}</h3> </div> <p>Check the <a href="${BUILD_URL}">console output</a>.</p> </div> </body> </html>
                emailext (
                    subject: "${jobName} - Build ${buildNumber} - ${pipelineStatus.toUpperCase()}",
                    body: body,
                    to: 'jaiswaladi246@gmail.com',
                    from: 'jenkins@example.com',
                    replyTo: 'jenkins@example.com',
                    mimeType: 'text/html',
                    attachmentsPattern: 'trivy-image-report.html'
                )
            }
        }
    }
}
Please replace YOUR_GIT_REPO_URL and YOUR_K8S_CLUSTER_IP with your actual Git repository URL and Kubernetes cluster IP respectively.
Phase 4: Monitoring
For monitoring the application and the Kubernetes cluster, you can use Prometheus, Node Exporter, Black Box Exporter, and Grafana. Here are the links to download these tools:
After downloading these tools, you can follow their respective installation and configuration guides to set up monitoring for your application and Kubernetes cluster.
Please note that this is a draft and might need further refinements. Also, remember to replace any sensitive information with placeholders when sharing the final article. Let me know if you need help with anything else!
Discussion
Join the conversation